What in the heck is a garage door limit switch? Well, that may not be your question, but it was certainly mine when I recently encountered a problem with a garage door opener, which, of course, captured my ridiculous curiosity of the cat and got me digging deeper into the simple reasons why a garage door would even need such a nefarious device. In my case, I lived in a home with a garage door from circa 1985, which I learned was actually quite dangerous. Safety precautions back then generally failed to account for how small children could be trapped beneath the heaviest door on your property. Sadly, some of those doors, often weighing in the hundreds-of-pounds range, resulted in permanent brain injury or tragic deaths of over 85 children between 1974 and 1996.
Well, those kinds of statistics tend to get my attention, so I decided to look around for a device I could count on for safety, as well as functionality. Now, this is not simply a tale of how to do something right, but also a message on how the best intentions can still blow up in one’s face (in this case, mine) by not paying attention. In my case, it was the garage door limit switch.
Let’s start with what a garage door limit switch does and why it’s so dog-gone important. A limit switch is essentially an electrical on/off switch determined by a value of physical travel in the operation. Whew! That sounded fancy! Now, let’s break it down into simple terms. Imagine, if you will, a light switch on the wall of your house. That switch operates in a fashion that does two things and two things only. Turns your light on and turns your light off. Simple as that. On/off. But what if the parameters and needs are unique in application? Okay, let’s look at that with garage doors…
The Garage Door Limit Switch – Your Start and Stop
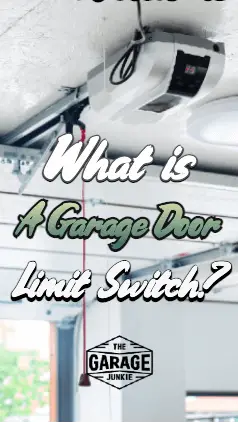
Garage doors are not ‘one-size-fits-all’ options. As they are not universal in size, shape, or purpose, there is a necessity for control adjustment(s). As mentioned earlier, a limit switch is a mechanism used in determining directional travel and distance. In the case of a garage door opener, it is important to realize that the initial action of opening or closing the garage door is typically initiated by either a wall switch or remote controller. After that command is given, the garage door motor operates in a forward/reverse action on a type of conveyance mechanism that allows the door to raise or lower. This can be accomplished through a variety of means, including a chain system, screw-drive, belt-drive, trolley rail, etc. The tracks themselves are not as critical as what tells the motor to start and when to stop. This is where I got into trouble because I got in a hurry.
A Limit Switch Cautionary Tale
We’re all guilty of taking shortcuts and, yeah, I’m probably worse than most. There’s the danger in overestimating one’s abilities or understanding the scope of a project. I’m actually pretty good at most of what I do, but reading directions? Yep, I’m not great at that. And that, my friends, can bite you in places you do not want to talk about.
In my case, I was in a bit of a hurry and just doing a simple replacement of an existing garage door opener. No biggie. All new parts, using the same anchor points as before. Screw some things in, bolt some things up, put new wiring to the brand-new photoelectric cells for the safety measures toward the bottom of the garage door itself… What could go wrong? Well, plenty, it seems.
I’ve got the door up in the completely ‘open’ position and press the button to close the door. The trolley starts sliding down track and I am completely in DIY heaven, trying unsuccessfully to find a way to slap myself on the back, and watching with unmitigated glee as the door comes to a complete close. Just like it’s supposed to, so imagine my surprise as the trolley keeps… on… moving… Right past the closed point in a forward direction and starts to bow the trolley rail upward toward the ceiling. I was still close enough that I was able to yank the garage door electrical supply cord from the electrical receptacle. The motion stops, but now I’ve got a trolley rail that look like the St. Louis Arch. And it’s stuck there. What could have gone wrong…?
Enter the garage door limit switch.
Get to Know Your Garage Door Opener
The thing about using devices that have adjustable travel distances and directional change is that they require physical input to inform them that there is, indeed, a change in parameters. Those inputs are not automatic, but rather are determined at time of installation and initial operation by the person installing the garage door opener. (Yeah, I blew it).
I put in a Chamberlain unit, the Pd510 model which is actually pretty simple to adjust those limits. That is, you know, assuming you read the directions… I chose a unit that was chain-driven, as opposed to belt-driven. Belt drives tend to be quieter than chains, but I had an older single-piece garage door that was quite heavy and I didn’t trust the belt to hold up over time. The property where I was changing this out was being sold on the open market and I was simply trying to upgrade it just enough to maximize my return. Safety is always paramount, so I opted for a ½ horsepower unit, due to the extreme weight of the door. (Honestly, this is pretty standard for pulling power. Although, now there are options for ¾ horsepower if you really need a boost).
More power is usually a good thing, but there is also such a thing as overkill. Considering the physical limitations I was experiencing, and my hesitation in replacing the entire garage door, I still believe that I made the right decision. My door was a one-piece unit requiring a single drag-point on the door lifting the entire weight of the door against the tension of large springs on either side of the door. (On a personal note, I do NOT recommend that style of door).
Adjusting the Timing on a Garage Door Limit Switch
The limit switch tracks the direction of travel and the length of travel on (in my case) the chain-driven trolley mechanism. Once it reaches the travel distance limit, it simply stops the motor. Once the switch is activated again, either by remote or wall switch, the garage door then travels in the opposite direction. The adjustment is often quite simple, but the timing of the adjustment in your installation is critical.
Once the installation of the garage door opener is complete and you are ready to activate the door, this is the critical period for adjustment. The garage door I was replacing was an ancient Stanley, circa late 80’s, which are no longer produced, and it utilized a system of adjustment knobs. Simple enough to adjust, but time-consuming. Repeatedly rolling the door up and down was necessary and you had to keep spinning the knobs to get it the correct position or travel length. One knob controlled the ‘UP’ position and the other was responsible for the ‘DOWN’ position. It necessitated a great deal of trial and error.
New Units, New Considerations – My Limit Switch Saga Continues
The Chamberlain unit, however, was much simpler! But remember that ‘more power is better’ scenario I presented earlier? That extra power, when you aren’t paying proper attention to what you are doing, can come back to bite you. I Suppose I was pretty confident that I understood the adjustment process would be similar to the Stanley, therefore my decision to ignore the directions.
I plugged the garage door opener into the proper receptacle and the area light on the Chamberlain comes on! (A great sign that I am on my way to a successful completion!) The power on the door easily handled the size and configuration of the hefty garage door and I’m watching it come up in an orderly fashion, when I suddenly realize that the trolley on the rail is not stopping where I assumed it would. And that powerful ½ hp motor? It bowed the trolley rail toward the heavens and I got a huge arch in the rail. Fortunately, I was able to yank the power out of the receptacle to stop the pressure (again!), but then was forced to do a bit of dismantling to relieve the pressure on the rail.
Important to note that the trolley rail on this particular unit comes in pieces that fit together similar to tent poles, as they have both male and female ends for assembly. Initially, I suspected this was simply a cost-saving measure on the part of the manufacturer, but as it turns out it was a stroke of genius on the designer’s part. The ‘sectional’ aspect is what allowed the trolley rail to bow without physically breaking. The pieces slightly separated, allowing for a successful arch and, in doing so, saved me from disaster.
When All Else Fails . . .
So, the design was sufficient to prevent total disaster, but what about the garage door limit switch adjustment? Sadly, this forced me to do something completely against my nature…
Yep. I read the directions.
This particular Chamberlain was actually pretty straight-forward about how to adjust the garage door limit switch travel. All I had to do was use the remote while in setup mode and press the on/off button at the points where the door was fully open and fully closed. It could not have been simpler. The hardest part was having the dexterity and observation to hit the button when the door was fully closed and to observe when the door was fully open. Sounds simple, but it is important to not put extra stress on the trolley rail. You do not want the rail to be arching under pressure, intentional or not.
Different Model, Different Adjustments – LiftMaster Limit Switch
As you do your research, another common brand you may run into is LiftMaster. It’s possible that your unit may have those knobs that I spoke of earlier. If that is the case, you will have two adjustments that can be made with a common flathead screwdriver.
One knob or recessed adjustment screw will be labeled as ‘open’ or ‘up’ and the other will correspond in the opposite fashion as ‘close’ or ‘down.’ This particular style may require a greater amount of due diligence and observation while the garage door is in motion. Remember that a garage door limit switch is not “intelligent,” so to speak, so you will need to tell it when to start and stop. I recommend adjustments in quarter- to half-turn increments with either a proper screwdriver or with a manual spin of a knob.
Safety First!
As always, safety is critical to any installation! Ensure that you have properly adjusted the infrared sensors at both sides of the garage door at floor level. When working properly, these should be providing a function of interrupting the closing a garage door when the beam has been broken, so to speak. This is critical where children are concerned. As stated earlier, small children (and even a few adults) have perished in the past from heavy garage doors trapping them under the weight and/or downward pressure of the garage door. Always perform a test of the door by interrupting the beam while the garage door is in downward motion. If functioning properly, the door should reverse and return to the fully opened position. If not, get that manual out and make certain that the garage door limit switch is correctly adjusted.
Closing Thoughts
Overall, the garage door limit switch is critical to safe installation and operation of any garage door opener. Always keep in mind that they are NOT universal in installation and/or adjustment, but they are necessary to prevent both damage to the garage door itself and, more importantly, in assisting the garage door from injuring people and pets. There may be wheels, knobs, recessed screw adjustment portals, remotes, physical electronic blocks, or other things to work with. But the bottom line is that despite the myriad methods available for proper adjustment of the garage door limit switch it is not something to fear or be overly concerned with. One word of advice, however…
You might want to read the directions.